
Once you’ve flown your drone, uploading the photos takes just a few minutes. The upload page is a three-step form with a Flight Manifest summary beside it.
Before you start
- Transfer the photos from your drone’s memory card to your computer.
- Images must be JPG files, and no more than 750 images can be uploaded per batch.
- A stable internet connection helps — drone photo sets are large.
Note: drone uploads are available on the Pay-Per-Upload and Enterprise plans. The 2.5D Map & Inventory subscription doesn’t include drone uploads — see the plans overview. On Enterprise, your Inventory role must include uploads (the “No Upload” roles can’t see this page).
Step by step
- Log in at app.silageplan.com and open the upload page — click Upload flight images on the dashboard, or Upload Images in the sidebar.
- Add flight images (step 1 on the page): click the upload area or drag and drop your JPGs onto it. You can fill in the rest of the form while images upload. On Pay-Per-Upload, files are held and only start uploading after payment clears — you can cancel any time before that.
- Where and when was it flown? (step 2): enter the Farm Name (if you’ve uploaded before, pick your existing farm so the new flight lands with your previous data), optionally the Site Name — the location within the farm you flew — and the Date Flown, the day you actually flew the drone. This date becomes the flight’s identity in your inventory timeline.
- Optional — notes and GCP/PPK files: expand Add notes, GCP or PPK files under step 2 to leave the processing team a note, Attach GCP file (CSV, TXT or XLS) if you used ground control points, or Attach PPK files (base & rover logs — OBS, MRK, NAV, UBX, BIN or ZIP). See Drone and camera requirements.
- What should we process? (step 3): choose Standard inventory (volume and tonnage measured from your flight images), Inventory + Measure & Create 3D (adds an interactive 3D model in Measure & Create — a paid add-on on Pay-Per-Upload), or 3D visualization only (a viewing-only model, no inventory measurements). If you’d like volume percent shrink measured on this flight — each pile’s volume change relative to the previous flight, reported as a percent — switch on Also measure volume percent shrink; not available with visualization-only uploads. Learn more in Track shrink.
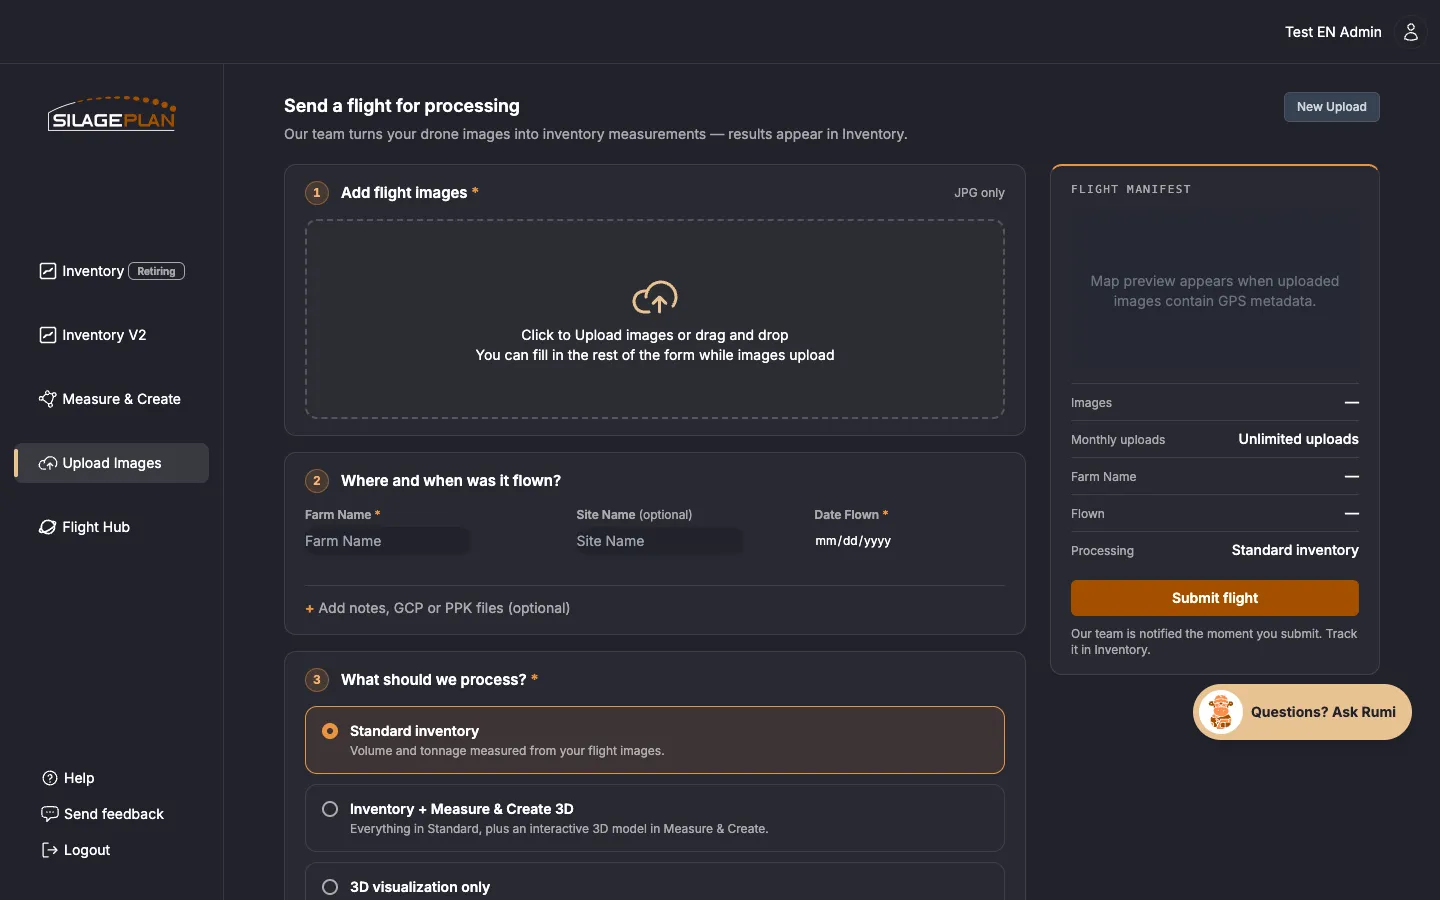
- Check the Flight Manifest panel — it summarizes your images, farm, and date, and shows a map preview when your photos contain GPS metadata.
- Keep the browser window open until the upload has completed. Closing or navigating away mid-upload can lose files — see Troubleshoot uploads.
- Submit the flight:
- Enterprise plans: click Submit flight.
- Pay-Per-Upload plan: click Pay $X & Upload (the button shows your live total, including any add-ons). A secure checkout window opens; complete payment, your images upload, and the flight submits automatically. Your form data is kept safe while the payment window is open.
- You’ll see an “Upload Submitted Successfully” confirmation summarizing the farm, site, date flown, and images uploaded. Use New Upload if you have another flight to submit.
What happens next
Your flight goes into the processing queue, where photogrammetry builds the 3D models and measures volumes — see Processing times. When it’s done, your measurements appear in Inventory under the farm, site, and date you entered.
Tips
- Upload one flight (one farm + site + date) at a time.
- Use consistent farm and site names between flights so your history stays connected.
- If an upload fails partway or images are rejected, see Troubleshoot uploads.